Enter the forest
Chronovisor: a model with three antennas and a screen showing a waterfall of signals
Inventions · Pellegrino Ernetti

Ernetti's Chronovisor: building the model step by step

A model made of real parts that picks up signals from the air

  • Czasjeden weekend
  • Kosztapprox. PLN 500
  • Poziomeasy, no soldering
  • Kroków6

The Italian monk Pellegrino Ernetti claimed he had built a machine that shows the past. Nobody has ever shown it. This guide describes a model: a wooden cabinet with three antennas, an SDR radio receiver, a screen with a signal waterfall and a speaker, powered by a battery pack. The model really does pick up signals from the air (radio, aircraft), but it is not a time machine.

According to Ernetti's accountthat is what he himself claimed, or those who quoted him. Nobody has verified it.
Scienceit can be measured and repeated.
Our reconstructionthis is how we built the model from shop-bought parts. It is not the original, because nobody has shown it.

Jak to działa: droga sygnału

The signal's path has five stages: antenna, receiver, software, screen and speaker.

  1. 1AntennaRadio waves from transmitters, aircraft and phones make the electrons in a metal rod vibrate. A tiny voltage appears, thousands of times smaller than in a battery. The better the rod's length matches the wavelength, the stronger the signal. An FM radio wave is about 3 m long, so a half-wave dipole would have arms of about 71 cm; in the box, telescopic rods of 25 to 70 cm are enough.
  2. 2ReceiverA small USB SDR (software-defined radio) receiver turns a slice of the spectrum into numbers. It receives roughly from 24 MHz to almost 2 GHz: radio, aviation communications, weather pictures from satellites.
  3. 3SoftwareThe SDR app draws a waterfall: frequency horizontally, time vertically (at the top is what is happening now, lower down what happened seconds ago), and the brightness of the colour is the signal strength. A strong station is a bright vertical line, noise is the dark background.
  4. 4Screen and speakerYou see the waterfall on a tablet behind a tinted pane, and the sound of the chosen station plays from a small speaker.

The knobs choose the frequency, bandwidth and sensitivity. A radio does not choose time or place: that is the difference between legend and physics.

Lista części i koszty

Body

  • Birch plywood 12 mm, sheetapprox. 60 zł
  • Wood screws, wood glue, stain, satin varnishapprox. 40 zł
  • Brass corners, 4 rubber feetapprox. 20 zł

Antennas

  • 3 rods Ø 6 mm: copper, aluminium, brass (or ready-made telescopic antennas with SMA sockets)approx. 40 zł

Tuning

  • USB SDR receiverapprox. 180 zł
  • 3 knobs with brass caps and a small USB controller with dialsapprox. 40 zł
  • 3 LEDs in holders (green, amber, red) with resistorsgrosze

Screen and sound

  • Acrylic glass 3 mm and clear double-sided tapeapprox. 20 zł
  • 50 mm speaker with a USB amplifier and a metal grilleapprox. 30 zł
  • Tablet or 10-inch monitor (we assume you already have one)0 zł

Power

  • 10,000 mAh power bank with several USB portsapprox. 60 zł
  • Toggle switch with a brass lever (optional)a few zł
approx. PLN 500About 500 zł in total, if you already have a tablet. Prices are approximate. There is nothing here that you would have to look for with “secret suppliers”.

Narzędzia. A cordless screwdriver, a saw for plywood (or have the boards cut at the shop), a jigsaw for the openings, sandpaper, a square and a tape measure. A soldering iron is not needed if you buy ready-made connectors.

1
Krok 1 z 6

Step 1: the body

A wooden box with brass corners and cut-outs for the screen and speaker

Skąd to wiemyThe idea of a large cabinet with a screen comes from the descriptions. The dimensions and materials are our reconstruction, chosen for real parts and safe work.

Take 12 mm birch plywood and prepare six boards: two sides 32 × 24 cm, top and bottom 40 × 24 cm, the back 40 × 32 cm and the front panel 40 × 32 cm. In the front panel cut two openings: a large rectangular one for the screen and a small round one (Ø 50 mm) for the speaker.

Join the sides to the top and bottom with wood screws and glue. Check with a square that the corners are 90°: a crooked box stays crooked to the end. Then glue in the back. Mount the front panel with four screws with heads showing at the front, so that it can be removed, because the electronics will be inside.

Finish: sand the wood with 120 and then 220 paper, apply dark walnut stain and satin varnish. Screw brass fittings onto the corners and glue four rubber feet underneath.

BezpieczeństwoWhen cutting and sanding, use goggles and a dust mask. Apply varnish in a well-ventilated place.
2
Krok 2 z 6

Step 2: antennas

Three antenna rods of copper, aluminium and brass on the top panel of the box

Skąd to wiemyAccording to Ernetti's account there were three antennas, made of three alloys of undisclosed composition (the descriptions differ: some mention two antennas, others several). In ours the composition is open: copper, aluminium, brass. This is our reconstruction.

Take three rods 6 mm in diameter: copper, aluminium and brass. Each conducts current, but the signal strength is decided above all by the length and shape of the antenna, not the kind of metal, so the differences in reception will be small. You can still compare and measure them, and that is better than a secret nobody will verify.

Lengths: an antenna receives best when its length matches the wavelength. For 100 MHz (the middle of the FM radio band) the wave is 3 m long. Half a wave is 1.5 m, in practice about 1.43 m, which means a dipole made of two arms of about 71 cm each. The box is only 40 cm wide, so we make a compromise: telescopic rods that extend from 25 to 70 cm.

Assembly: drill three holes in the top plate for SMA antenna sockets (or simple terminals), spaced 8 cm apart. Finish the rods with a thread or a cap and screw them into the sockets. From each socket run a short coaxial cable to the inside: the shorter it is, the smaller the losses.

BezpieczeństwoThree rods next to each other affect one another, so use them one at a time during testing. Do not place the box under a power line or on a wet yard, and during a storm do not stand holding a metal rod.
3
Krok 3 z 6

Step 3: tuning

Panel with three knobs, three LEDs and two plates under the screen

Skąd to wiemyThe descriptions mention dials and buttons for choosing the time and place. A radio chooses a frequency, not a time or a place. That is why the panel has two plates: a decorative “time · place” one (from the legend) and a real “frequency · band · sensitivity” one (science).

The heart of the tuning is an SDR receiver on USB, costing about 150 to 200 zł. You plug it into a tablet or computer, and a program draws the signals as a colourful waterfall.

Knobs: buy a rotary encoder with a knob, or a ready-made small music controller with several knobs, connected via USB. The SDR program lets you assign functions to the knobs: the first changes the frequency, the second the bandwidth, the third the gain. In the holes in the front plate, mount the knobs with brass caps.

For effect, add three LEDs in holders, powered from USB through resistors: green (the receiver is working), amber (there is a signal) and red (overload). It is decoration, but it captures the spirit of old equipment nicely.

4
Krok 4 z 6

Step 4: screen and voice

Tablet with a waterfall of signals behind a Plexiglas pane, and a speaker with a grille

Skąd to wiemyAccounts mention a picture tube. For us the screen is an ordinary tablet, which is our reconstruction.

Screen: an ordinary 10-inch tablet or monitor, hidden in a rectangular opening behind a Plexiglas pane. The pane should be slightly tinted. Buy a 3 mm Plexiglas sheet, cut it to the size of the opening with a 5 mm margin, and glue it on from the inside with clear double-sided tape.

Waterfall: bright lines are strong stations, the dark background is noise. You turn the knob, and the picture moves along the band.

Sound: next to the screen, mount a small speaker with an enclosure, for example a round 50 mm one, with a slim amplifier powered from USB. Cut a Ø 50 mm hole in the front plate, and glue a metal grille on the front. Send the sound from the SDR program to an external sound card or via Bluetooth. A light treble filter in the program will give the sound of an old radio.

BezpieczeństwoNever take apart old televisions and do not try to build your own picture tube. A cathode-ray tube operates at a voltage of the order of a dozen or even several dozen thousand volts, can hold a charge long after being unplugged, and the glass is under vacuum and can implode.
5
Krok 5 z 6

Step 5: power

Inside the box: SDR receiver, speaker amplifier and battery

Skąd to wiemyLegends speak of a device that draws enormous power. Our model draws a dozen or so watts and has no mains cable at all.

We power the whole thing from a portable battery (power bank) of 10,000 mAh with several USB sockets: one powers the tablet, another the receiver. Hide the battery at the bottom of the box on a shelf made of a rubber mat. Run a cable out to a USB-C socket in the back wall so you can charge without taking the box apart.

You can install a switch with a brass lever in the cable that powers the speaker amplifier. You only switch 5 V.

Grounding: not needed in our case, but it is worth getting into the habit: you can connect the metal parts of the casing with a wire, and do not place the box near chargers and switching power supplies.

BezpieczeństwoEverything in this guide is low-voltage. If any step would require opening a device connected to a wall socket, taking apart a television, or playing with high voltage, stop. This is not that guide.
6
Krok 6 z 6

Final assembly and first start-up

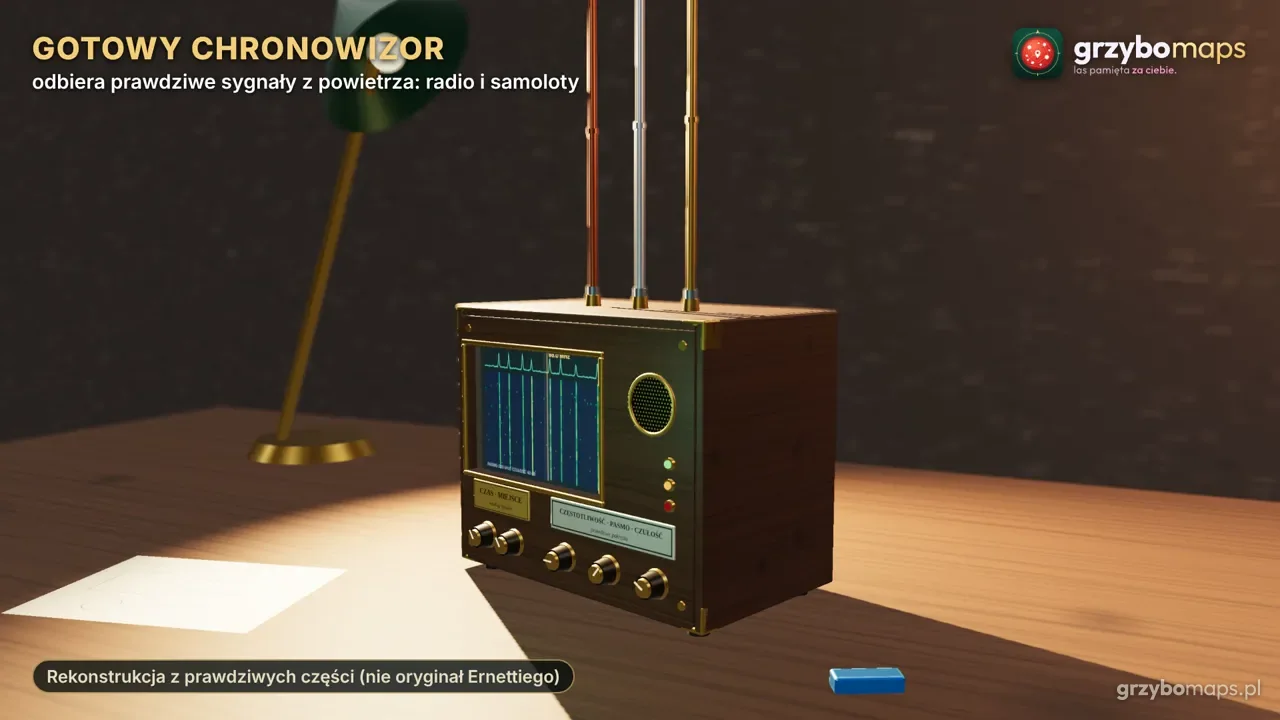
The finished chronovisor model: a box with three rods, a screen and knobs

Put everything together so that the cables are tidy and fastened to the walls with cable ties. Attach the receiver with hook-and-loop tape close to the antenna sockets, slide the tablet into the holder behind the pane so that the screen fills the opening. Make a few ventilation holes in the back wall (the receiver gets warm). Screw on the front plate.

First start-up: extend one rod to about 70 cm, start the program, set the frequency to 98 MHz and the bandwidth to 200 kHz. On the waterfall you will see vertical, bright lines: those are radio stations. Choose the strongest one and you will hear a broadcast.

Tip: label every wire with a small sticker and take a photo of the inside of the box before you close the front panel.

Trzy doświadczenia do zrobienia w domu

1

Aircraft

Set the frequency to 1090 MHz and shorten the rod to about 7 cm, because that is best for this frequency. On the waterfall you will see short, trembling streaks: these are signals from aircraft, which keep broadcasting their position, altitude and flight number. A free program for decoding them will show you a map of the aircraft flying above you.

2

Light delay

Go out in the evening when the Moon is visible. You see it as it was about 1.3 seconds ago. The Sun: from 8 minutes and 20 seconds ago. Sirius: from almost 9 years ago. The Andromeda Galaxy, visible to the naked eye in a dark place: from 2.5 million years ago. This is a real chronovisor, and everyone has had one since birth: the eye.

3

Echo

Stand about 35 m from a large wall, clap hard and count how much time passes before the echo returns. Sound travels about 340 m/s, so 70 m there and back takes about 0.2 seconds. Record it with your phone and look at the sound graph. It is a tiny model of how the trace of an event comes back with a delay and fades.

Gdy coś nie działa

The screen shows only noise

Check in order: whether the receiver is pushed all the way into the port, whether the program sees it in the device list, and whether the antenna is screwed all the way into the socket. Half of all radio problems end with a loose connector.

Interference at regular intervals

Almost always the culprit is a nearby charger, a laptop power supply, a dimmer lamp or the tablet itself. Move the box a metre away from sockets and mains cables, and put the antenna out above the top of the box. A ferrite bead clamped on the USB cable helps.

The station is audible, but it sounds like it's coming from a barrel

The bandwidth is too narrow. Widen it, or choose the reception mode in the program that suits the station: wide for FM radio, a different one for aviation communications.

The receiver gets warm

That's normal, but don't close it up tightly: make ventilation holes with a mesh in the back panel.

I don't understand anything on the waterfall

Give yourself an hour. It's like learning to read a map: at first everything is colourful noise, but after a few evenings you will recognise stations the way you recognise trees in a forest by the shape of their leaves.

Co dalej

A better external antenna on a mast or windowsill (a window up close dampens the signal). A small LNA amplifier right next to the antenna. Recording the waterfall for a week to see how the life of the ether changes from morning to night. With a bigger antenna and patience: the radio signal of Jupiter or the Sun. Or an exhibit for a fair or for school: say what is legend and what is physics.

Co mówi prawo

Receiving radio signals broadcast for everyone, for example FM radio or aircraft signals, is common and permitted. The content of other people's non-public conversations and messages must not be disclosed or used, and eavesdropping on other people's correspondence is a crime. This is not legal advice, just common sense: listen to stations that broadcast to everyone, and do not collect other people's data. Working with wood and low-voltage electronics requires no qualifications, but never open devices connected to the 230 V mains.

Co mówi teoria

According to Ernetti's account, the device was built in the 1950s and 1960s by a secret team of scientists, and was meant to receive the electromagnetic and sound waves that remain after events and show them on a screen. No diagram, photograph of the device or independent witness confirms this. The only material trace, a photograph from 1972, turned out to be a photograph of a wooden sculpture of Christ by Lorenzo Coullaut Valera.

Science gives a firm “no” for four reasons. Dispersion: after a few seconds sound turns into heat and mixes with the motion of molecules, and the information about how things were arranged is dispersed (entropy). Distance: radio waves from the 1930s are still travelling through space, but they weaken with the square of the distance, and the noise of space is billions of times stronger than they are. No record: light that bounced off people and buildings of long ago flew off into space or was absorbed, and we read the real past from traces: ruins, bones, pollen, coins and manuscripts. Logic: showing a chosen moment would require solving an inverse problem, in which many possible pasts give the same result.

The idea that the past leaves traces to be read has a longer history than Ernetti: in 1837 Charles Babbage wrote that the air is a great library in which all words are written. Astronomers, on the other hand, really have been looking at the past for over a hundred years: the light of a distant galaxy is old.

Sources